Level 1 – Sum Island.
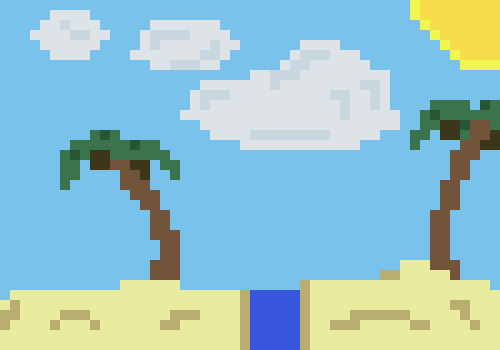
To make the level I needed to go back to my concept art. The first level I decided to make was based off of this concept art:
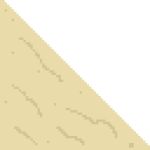
I started off by making the tiles for the floor of the level. I made the floor to make it resemble sand and to do this I used different shades of brown or peach and added waves and spots to resemble grains of sand. I also added rocks and a star fish to some of my tiles to make it look more like a beach.
These tiles were made in a 64 by 64 pixel resolution.


The next step was to put them all together and make a tile sheet. I made a mistake and thought a sprite sheet was the same as a tile sheet. I look it up and realized that a sprite sheet was for animations and I do not intend on having animations for the sand. I realized that something went wrong when I uploaded the sprite sheet into Unreal Engine I couldn’t use the tiles in tile map.
![]()
This was the sprite sheet that I made for the level you. You can tell that it is a sprite sheet because there are space in between each tile. The one thing I did correctly was for the water since I plan on adding animation to the water anyway. I needed to load up Photoshop again to make a proper tile sheet.
This is the tile sheet. You can see that it is a lot smaller and there is no gaps in between each tile. The reason why it is a lot smaller is because I recently found out that Unreal Engine has the same feature as Photoshop where you can enlarge the image to it’s nearest neighbor I find this better because when I do the exact same thing in photoshop the image still loses some of it’s quality whereas if I use the nearest neighbor feature in Unreal the image’s quality stays somewhat similar and the image is a lot more sharper and pixelated which is what I want for my game.
As soon as I finished making the sand tiles I needed to make the water sprites.
In most 2D platformer games you’ll find that there are cliffs or gap on the floor that the player needs to avoid. This will give the player an obstacle to avoid. For this Island level instead of just having a gap on the floor I instead made it so the players falls in the water as it fits with the island level.

When the player hits this sprite it will cause the player to die.
Like the previous level design I quickly went back to the concept art I made to get an idea of what I want for this level and also since I wanted to use Mayan influences I used the Mayan Artwork moodboard I created for my research.
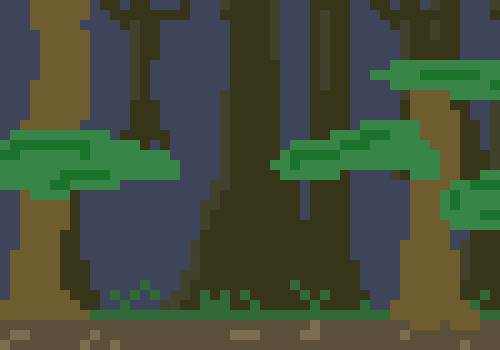

The first thing I created was was the floor so I needed to make the dirt tiles. I made the tiles on a 64 by 64 pixel resolution.
Here are all the dirt tiles.


The next task I set for myself was to make some brick tiles. The bricks are to make it look like the jungle has some ruin in it kinda like mayan ruins.
I made the bricks look mossy and cracked as if to say they were there for a really long time. Here are all the brick tiles I made.


I then started using my Mayan Moodboard to make the wall art. The following video shows the making of some of the tiles I made when using the moodboard as inspiration.
Here are the rest of the wall art I made that were inspired by the moodboard.


This was quite challenging to make mainly because the resolution was on 64 by 64 pixels meaning I couldn’t really make really nice curves like in most Mayan art. Also the fact that I was in such a small workspace made it difficult at times to plan out where I’ll be placing certain patterns and I couldn’t go too detailed as I’d often run out of space.
The thing I’m most proud was the moss I added to the wall. I didn’t expect it to look that good. By lowering the opacity by 50% and by using a darker shade of green when drawing on top of the patterns gives a really nice effect. And also for the dirt tile I didn’t expect the pattern to look so good after adding a stroke layer effect on it, the dirt tile looks exactly how I imagined it to look like especially after using the stroke effect.
