Before I create any level for my game I needed to set up the player character. I first imported the sprite sheet I made I made for the main character, I then set up the flipbook and apply that to the 2DSidescrollercharacter blueprint. Then I needed to make that new character play the run and jump animation I made.
In the end you can see that what I did for the jump animation was if the ‘Z’ value was more than 0 then the jump animation will if this is false then the player is simple either idle or running which is why I connected the return value of the idle and the running animation to the false node.
I recently started watching a youtuber named WazzaTuts which was suggested by my tutor Lee. WazzaTuts has a series where he demonstrated how to make a 2D level and you can see that I used some of his methods.
In the ‘setting up character sprite’ video I made you can see that in the event graph of the 2dsidescrollercharacter I made it so that the jump, running and idle animation would play. I made some changes to this based on what I’ve seen in WazzaTut’s tutorials, I did this because it’s a lot more organised.
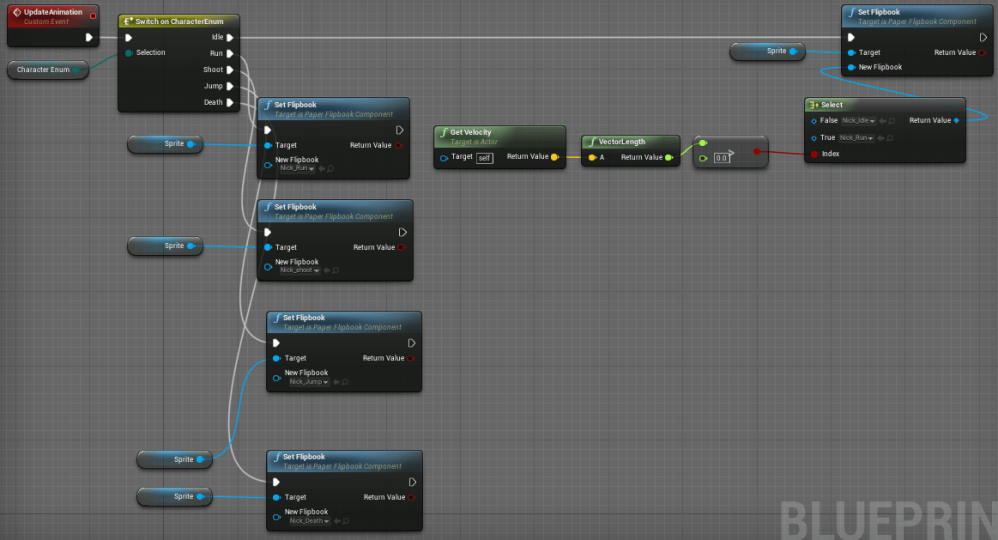
Here you can see that I am utilizing the ‘Enumeration’ blueprint found by right clicking in the contents bar in advanced assets. I then named all the animations for my character. This doesn’t do anything but now that the Enum has been set up all I needed to do was make a variable out of the Enum Bluprint I made and I can then apply it to the character blueprint. By right clicking on the event graph and searching for ‘Switch On’ you should find the Enum blueprint you created with all of the animation you wanted. To set this up simply attach the Enum variable to the selection node and then attach a ‘Set Flipboook’ to the animations.
Next thing I did was set the jump animation to the ‘InputAction Jump’ which is an event.

After I applied the animations to the Character Enum all I needed to do was ‘SET’ Character Enum variable onto the Event Graph and on the drop down I can select Jump. If I wanted to play the death animation then the same principles apply.
Next I did the shooting animation. This was more complicated because I didn’t want the animation to play when in the air so I had to figure this out on my own.

It starts off with an event ‘Left Mouse Button’ A branch is connected to each node. On ‘Pressed’ there is a condition that if ‘Is In Air’ and it is true then the jump animation will play if false then the shoot animation will play. This is so that when the player shoots while the character is in the air then the jump animation will play instead of the shoot animation which looks weird if the character is airborne. Then on release of the button there is another branch with the condition that the character is on the ground. If this is true then the player is idle and if false then the jump animation will play. You can see that the jump and shoot animation extends on to the projectile code. This is me creating the projectile blueprint –
After I made the my character shoot I noticed that I was still able to move whilst I’m shooting, it looked like my character was hovering of the ground so to fix this I did this.
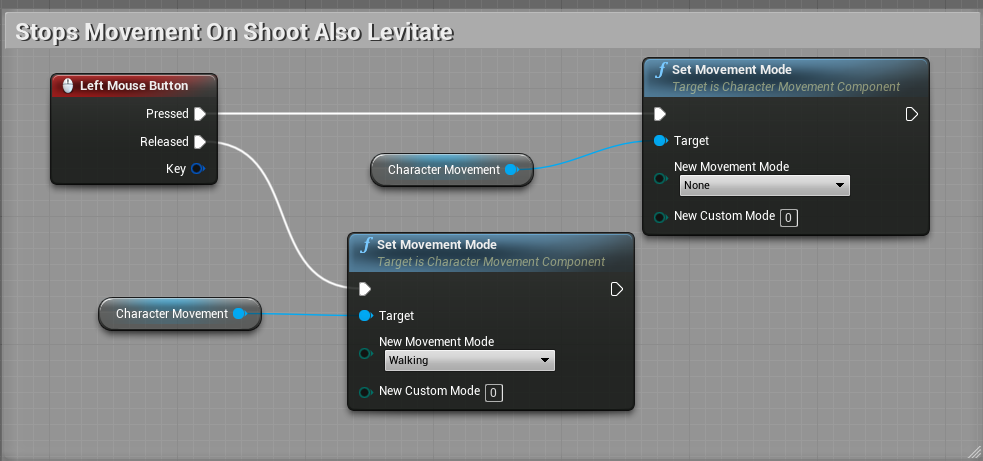
This solved my problem but I accidentally made it so that when I shoot in the air my character levitates because I set the movement mode to none. I decided to keep this in because it made a pretty cool gameplay mechanic.
I set my bullet blueprint to have 0 gravity that my bullet will travel in a straight line, the problem with this is that my bullet will travel all the way across the map until it hits something I don’t want this because the player could use this to kill enemies without even seeing them. To solve this problem I went to the projectile blueprint and added a ‘on component activate’ event and gave it a 1 second delay and upon completion of this delay ‘Destroy Actor.’

In my script there’s a bit where the Narrator gives the player a multiple choice question.
“Is it:
A: All of the above
B: ‘J’
C: ‘Space Bar’
D: ‘W’ ”
If the player presses the ‘J’ key I wanted to kill the player.
So this is what I did.
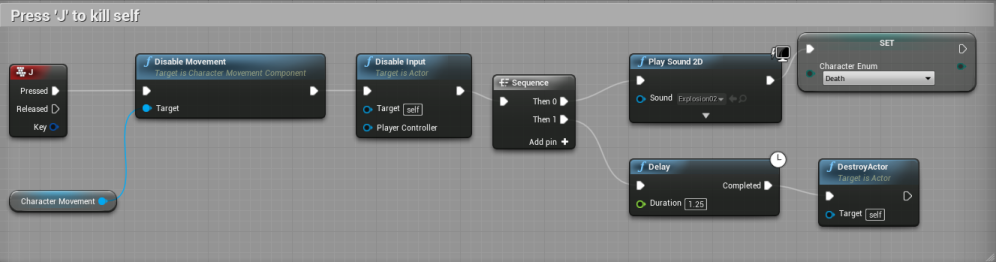
It wasn’t as simple as pressing ‘J’ then ‘Destroy Actor’ because I wanted my animation to play before I destroy the actor. There are also other issues I need to fix. The first issue with this is that when I press ‘J’ the the player dies and the player doesn’t see the death animation. To fix this I added a Delay of 1.25 seconds so the player gets to see the animation before the actor is destroyed. The other issue is that when the animation plays the player can still move the character. So upon pressing ‘J’ I disabled movement then disabled player input. Attached to the disable player input is a sequence. On Then 0 I added a play sound which on the image it says Explosion 02, this came with Unreal but I made a SFX in FamiTracker.
Health Bar and DMG system.
For the health bar and Damage System I used WazzaTuts’ videos for help. First I looked at his video for making and adding the HUD. In this video he talks about how you would make a custom health bar but doesn’t go into much detail on it but it gave me enough clues to lead me into adding my own custom health bar.
In this video he puts a coin counter in his HUD which I will not have.
How I made my own custom health bar:
I first drew the a heart that is full and the heart that was empty using Photoshop.


Then I went into Unreal Engine and followed WazzaTuts’ tutorial up to the part where he adds in a progress bar.
Then I needed to change the progress bar so that it looks like the heart.
After adding the progress bar there should be options to the right hand side of the screen to help you change the way the progress bar functions. To change the appearance of the progress bar here is what I did.
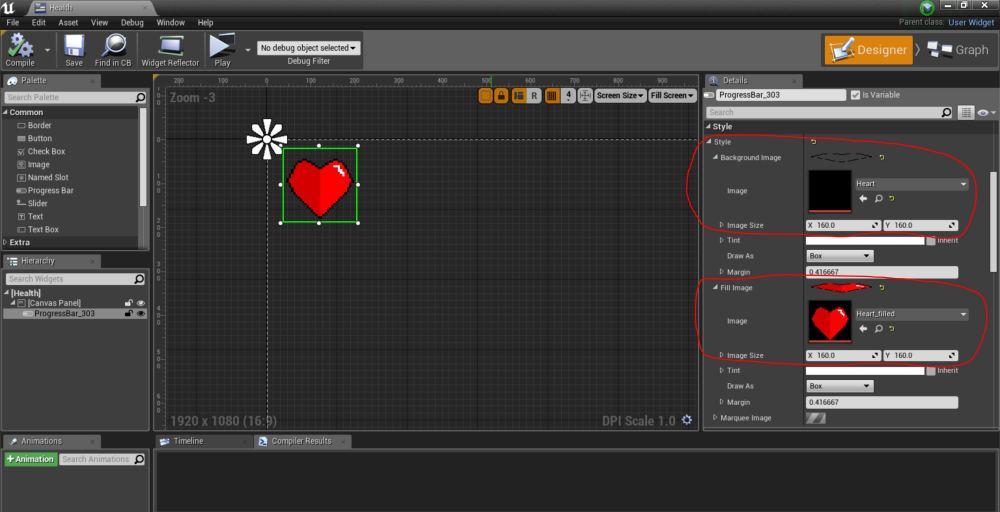
For the Style option I changed the background image simply by dragging in the empty heart image to the image box. I did this the same thing to the ‘Fill Image’ only difference is I dragged the full heart image to the image box.
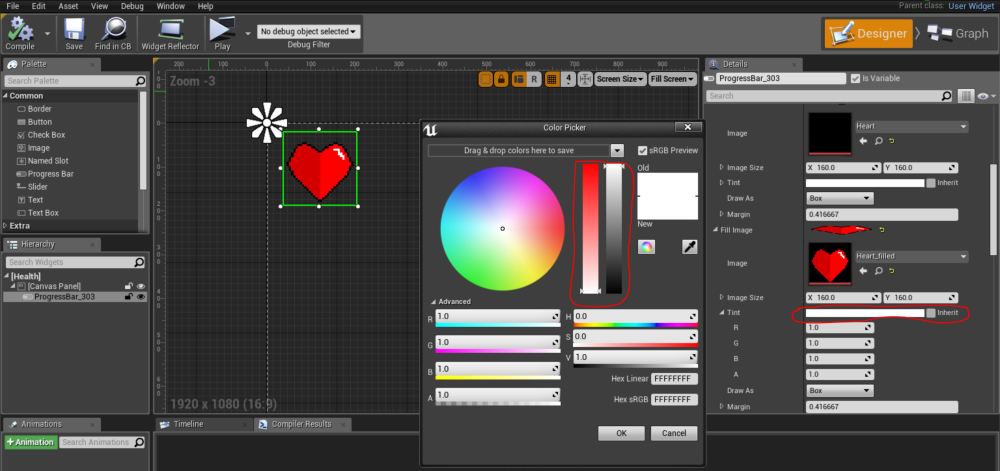
Last thing I did was change the tint to white.
To make the progress bar lose it’s fill when the player loses health I followed WazzaTuts’ next tutorial.
Damage system
I then needed to make the damage system. This damage system will be used for the enemy projectiles and I will be able to set how much damage it will deal to the player.
This is the next tutorial I had to follow.
Moving Platform.
In the video above you can see that I made an elevator that continuously moves up and down my level. In order to do this I first needed to make a tile that is 3x the length of a normal sized tile which is 64 pixels in length and all I did then was make a photoshop file that is 64 by 192 pixels and duplicated the tile I made for this level.
To make the platform move I converted the image I made in photoshop and converted it to a sprite done by right clicking the image, hovering on sprite action and clicking on create sprite. Then I made a new blueprint actor and added a sprite component to it allowing me to change the appearance of the blueprint to the platform I made in photoshop. This is where it started to get complex but luckily I already had a vague understanding of after having a lesson with Lee on moving doors and Timeline Vector Tracks. I went into the blueprint event graph and deleted the ‘Event ActorBeginOverlap’ since I only needed the ‘Event BeginPlay’ since I want the Blueprint to activate upon hitting the play button and I also needed ‘Event Tick’ which is an event that gives a constant stream of information to the game.
Before I started adding information to the event graph, in the video you see me add 3 variable one Boolean named ‘Start,’ one Vector named ‘Plat Location’ and a Float named ‘Plat Start’ For this game I only needed the vector variable. The reason why I added a float, a boolean and a delay node was because I wanted the platform to move at a specific time but I then realised that having this would be a bad idea unless I wanted to make the tutorial a timer based exercise. The Delay will allow the platform to move at specified time.
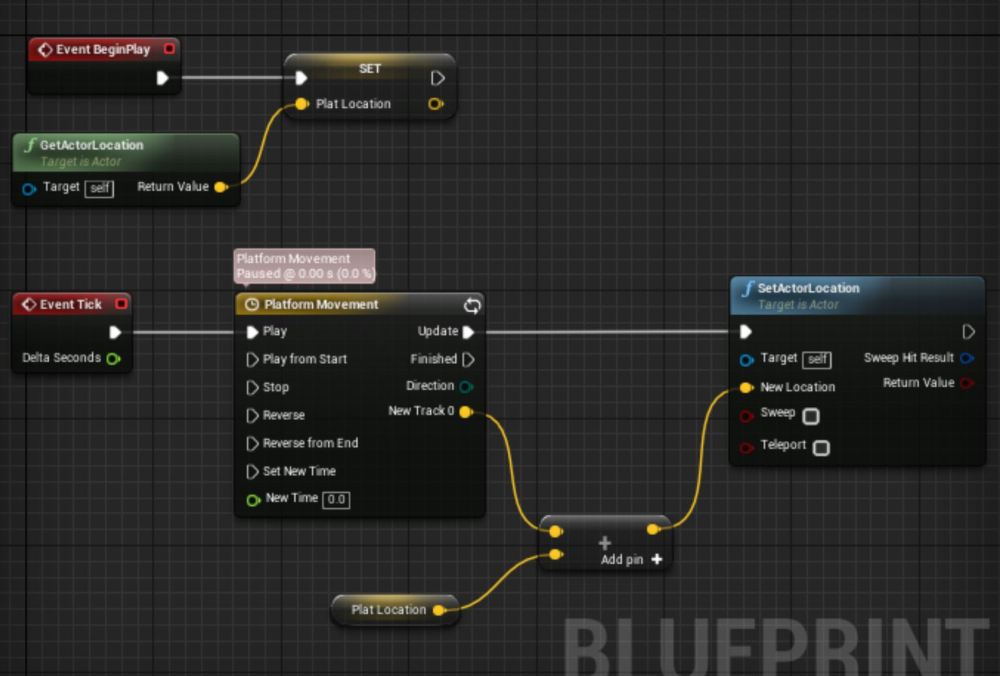
This is all I’ll be needing. You can see that I got rid of the Boolean and Float variables and also the delay node. (I did this after making the video).
The ‘Platform Movement’ is a ‘Timeline’ and by double clicking on it, it should take you to a different screen. On the screen click on the V+ icon which is a Vector Track. This is basically like adding keyframes. I set the duration to be at 8 seconds that way the timeline will loop after 8 seconds. By locking the X and Y axis I was able to set keyframes only on the Z axis which is what I’ll be needing for an elevator. I right click on the vector track to add a ‘Key to Z’ and on the top you can see that I set the time to 0 and the value to 0 because at start I want it’s Z value to be 0. I set another Key on Z this time the time is set to 4 seconds and the value is set to 200 which means that in 4 seconds the platform will have moved 200 in Z axis. The last keyframe is set at a time of 8 seconds and a value of 0 meaning at 8 seconds the platform will be back at 0 in the Z axis. Once this was complete a new vector node named ‘New Track 0’ was available. I dragged of this and added a vector + vector and got the ‘Plat Location’. I set this to the ‘New Location’ of SetActorLocation which is also connected to the ‘Update’ Node on the ‘Timeline’ meaning the platform should be moving up and down on the location it’s placed on in the map.
In the video you can see me testing this out but I encountered 2 easily fixable problems. The first problem was that the platform wasn’t moving very far and then next issue was that the platform never goes back up after finishing it’s transition. I fixed the first issue via trial and error. I previously set the value on the vector track key frame to 200 but ended up changing to 1500 which was the perfect value for me. Then I simply set the track to looping by clicking on the looping icon at the top which fixed my second problem.
Making Crab Island.
0:00 – 13:00
Here you can see the process of making the level platform using the Tilemap feature in unreal. You can see that I use different sand tiles to add a bit of variety to the level. This a long process but luckily I have a reference to copy from.
This is the level plan I made during Kelly’s lesson. I didn’t want to make a tilemap and randomly plot down tiles and hope for the best.
The drawings are very simple but tells me where to plot tiles and sprites.
13:00 – 29:40
I make the blueprint for the water ‘Death Trigger.’ This is so that when the player falls and hits the bottom of the water the player’s damage system will activate, make the players health 0 and activate the death animation. This was simple as all I needed to was make a flipbook for the water, make a blueprint, add the flipbook and give it a box collision. This box collsion needed to be slightly taller than the water flipbook so the player collision capsule would overlap with it. Then by clicking on the box collision I gave it an event known as ‘Event begin overlap’ and dragged of the node on the event graph and added a ‘Cast to Nick’ (Nick is the name I gave to the player character the default name was 2Dsidescrollercharacter), after ‘Cast to Nick’ I added the Damage System which I made in the character blueprint. In the video you see me add a disable input. This is because I didn’t want the player to be able to move the character after playing the death animation. I deleted the ‘Disable input’ because I already set that up in the character blueprint do adding it in the Water Death blueprint was completely unnecessary.
29:40 – 56:37
Here I started adding palm trees. The palm tree you see me place on the map is just a sprite that doesn’t do anything. The reason why I added it there was because I didn’t want the player going back. This palm tree simply acts as a wall. The next palm tree spawns a coconut that falls down that upon colliding with the player it will take half of the player’s health.
The reason why this took so long was because I was trying to figure out a way to make the coconut spawn but I ended up just copying the projectile blueprint I made in the character blueprint. I realize that I should have just done this from the start.
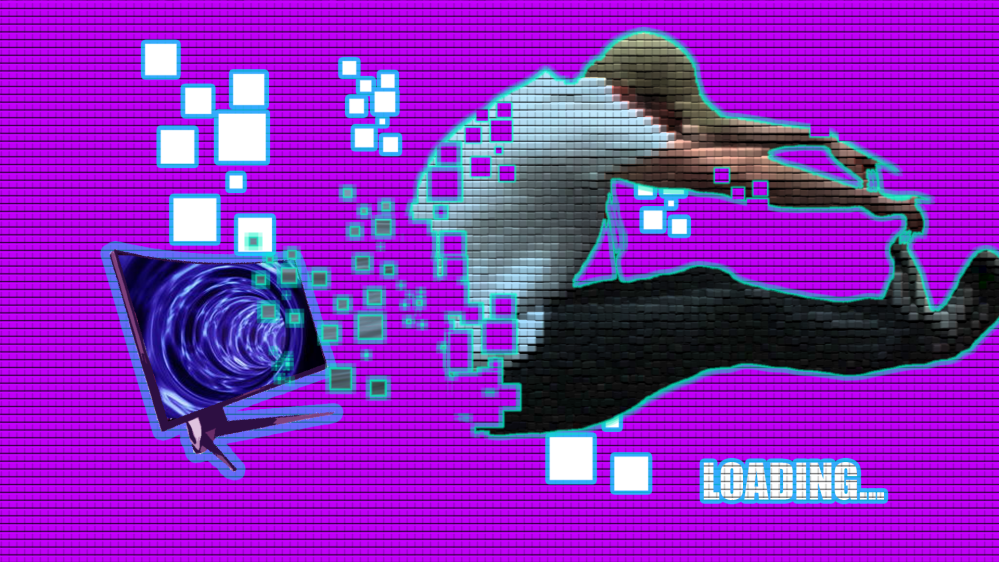
Loading Screen
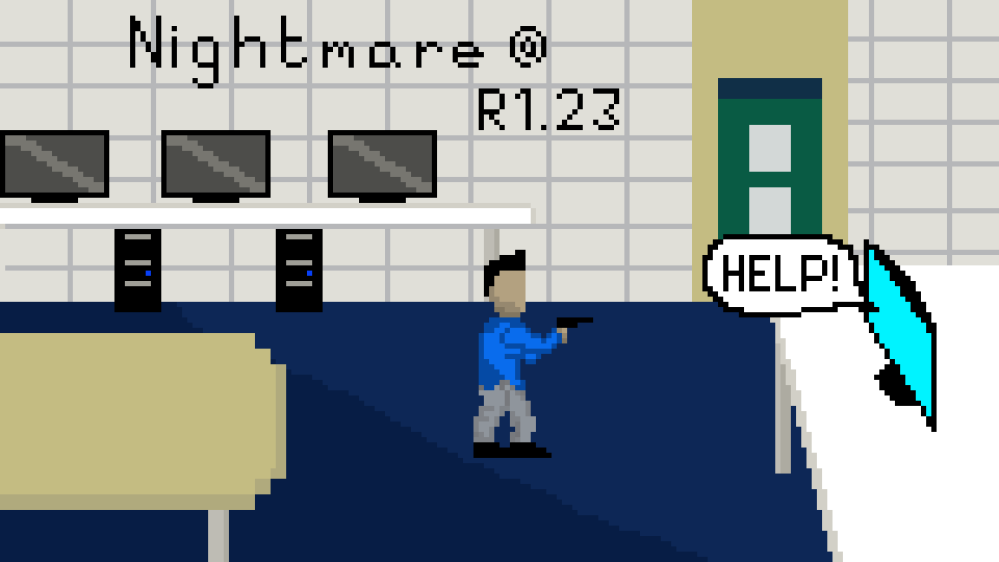
Before I started making the next level I decided to make the loading screen for the level transitions. Since the plot of my game is about my friend getting sucked into the virtual world I decided to make the loading screen look as if they are entering the computer screen.
To make it look like they getting sucked into the screen I made them look pixelated by using the filter gallery tool in photoshop, and by making a brush out of squares I made the illusion that they are being dragged in by pixel by pixel.
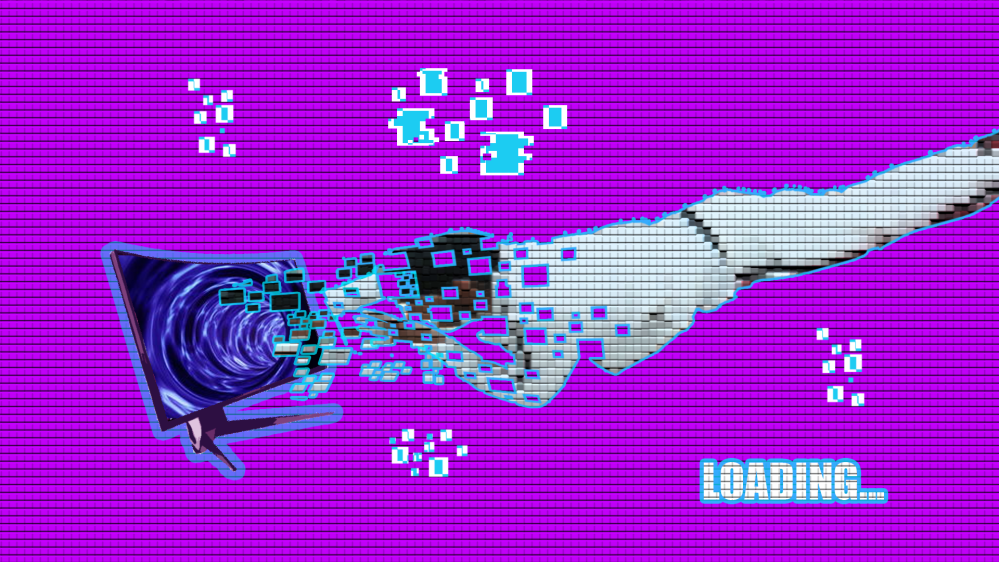
Here is how I made the loading screen:
I also did this for my friend Owain.
.
Making the level transition
To make the level transition I used this video I found in YouTube for help.
I used this method and worked brilliantly. It worked exactly the way I wanted it to but for some reason something went wrong and it destroyed my progress.
Game breaking problem.
I used the same exact method to make the level transition as what ‘Totally Unreal‘ did in his tutorial and worked exactly as it should. But after trying it again later on when I showed my friend, instead of it changing levels when I hit the portal it flicker back and forth from tutorial level to island level. I did not change the blueprint in any way nor have added anything else in. Normally when there is an error Unreal Engine would show us but it didn’t. It wasn’t a problem with the blueprint itself because I tried other methods to make a level transition and it didn’t work, it also wasn’t the fault of the level itself because I made a whole new level and the same problem would occur.
This was me and two of my other friends Sam and Manny who are both skilled at Unreal trying to fix the issue. We tried changing the blueprint, changing the level and we couldn’t figure out what to do. I must have accidentally corrupted some save files somehow because when I loaded an autosave the same problem still occurred. The quickest and most simplest solution I can think of was to start over. All I needed to do was copy the event graphs from the blueprints I made in this project and paste it into a new project. There were things I couldn’t copy and paste but it was quick to redo anyway.
Making the Enemy.
I’ve already got the sprite for the crab enemy and I made the flipbooks for them exactly the same way as my main character.
Once I made the flipbook I moved on to making the blueprint for the crab starting with the flying crab.
I wanted to get it’s movement done first. I worked with Lee on this and this is how we did it.
We started off by adding a component to the blueprint. That component is called InterpToMovement I use to set the duration for the blueprint to move from point 1 all the point to point 3. I initially set the duration to 3 but after testing movement after completing the blueprint I felt that it was too fast so I later changed it to 10. After setting the duration I we went into the construction script and added 3 vector variables (vectors being the variable that handles movement) and named them Points 1, 2 and 3 making sure to then tick the ‘instance variable’ and the ‘Show 3D widget’ boxes in the variable settings. The reason for this is because we want the crab to move side to side so from point 1 to point 2 but then we’d want the crab to move back to it’s starting position so we will set point 3 exactly where point 1 is set. We then dragged the ‘interptomovement’ component into the script and ‘get’ it and did the same thing to the 3 vector variables we made. The next thing we did was completely new to me so don’t really understand the reasoning behind all of it just yet. We dragged off of the 3 variables and we connected each of them to a ‘Make InterpControlPoint’ and from that we dragged of the ‘Interp Control Point’ nodes and connected them to a ‘Make Array’ which to my understanding is a way to quickly access variables. The next part of the script left us stuck so we left it for later and moved on to the event graph.
We went into the Event Graph and got our ‘interptomovement’ component and connected it to a ‘Restart Movement’ which will loop movement. Before that however we needed to make sure it doesn’t loop before finishing it’s course so we connected the event begin play to a ‘Delay’ which we set the delay duration to the same duration as the ‘Interptomovement’ component. We connected the delay and restart movement and that was it for the event graph.
We then went back the script to figure out the next step. Turns out all you needed to do was make an interp to movement variable and drag off of the inter to movement component and ‘Set’ it.
The code was complete for the enemy crab movement and all that’s left to do was to place the crab into the world and place it’s points down so it knows where to move.
The next step was adding the health system for the crab and casting it to my Bullet_BP. This was tricky to figure out because up to this point what I’ve been doing up to this point was adding an event called ‘Begin Overlap’ to the actual enemy blueprint itself, casting the Bullet Blueprint to it and upon collision it destroys actor.
Doing it this way makes it easy for the player as it only takes one shot to kill the enemy. And then I figured out that I can just do the same exact damage system I did for my Character Blueprint and apply it to my Enemy Blueprint.
Hear you can see that instead of using float variables, I use integers instead. The only difference between these two variables are that float variables hold decimal numbers whilst integers hold whole numbers.
Near the end of the video you can also see that I have a Ground Crab Blueprint. For that blueprint I simply just copy and pasted most of the stuff from the Flying Crab Blueprint as they both do the same function only difference being that one of them flies and the other is on the ground.
Making starting menu
I found making the starting menu easy as I simply just wanted to make ‘Start Game’ button which when pressed starts the game. After playing around with the HUD widget I now know how to set up the buttons for this starting menu but like the first widget I made, I needed to make my own custom images. Starting with the main menu background image I went to Photoshop and worked on a 192×108 resolution document and drew this –
I then exported this image by 1000% to make the image resolution 1920×1080 which is the standard size for a monitor. I then drew the start button.
After importing this to Unreal I then started making the widget. Since I already know how to add this to the viewport after I made the Health Bar I already had an idea on what to do and after creating my loading screen I also knew how to open up a level in game.
I do all of this in this video.
Problem with background.
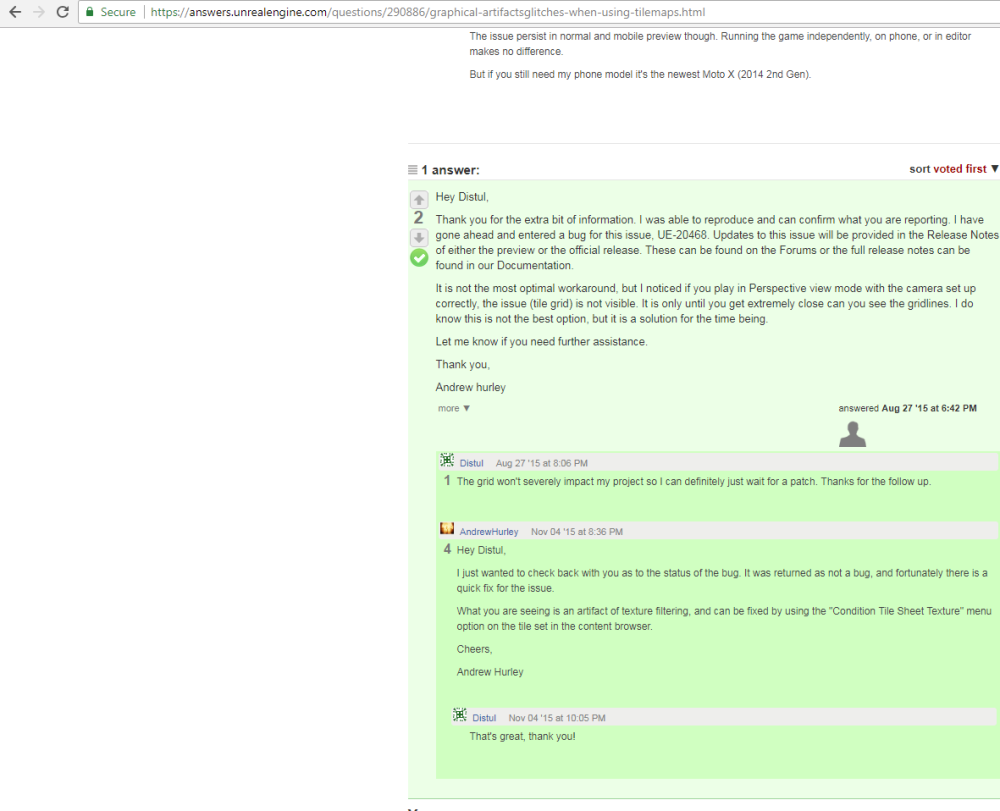
When I hit play there is an issue with the background where it would show white lines as if there was a grid.
At first I thought this was an issue with the lighting and so I clicked on ‘Build’ but it did nothing. I then looked this issue up and found that other people had the same issue. They concluded that to fix this was to ‘condition tile sheet texture.’
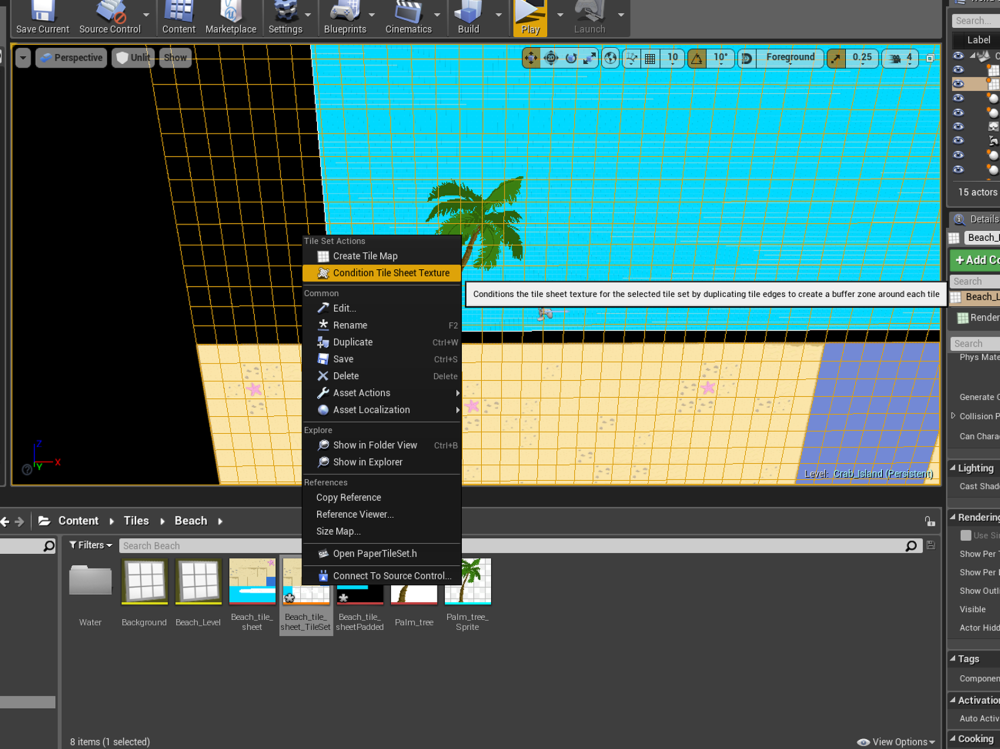
After clicking ‘condition tile sheet texture’ the problem was immediately fixed.
Problem – Game looks dull.
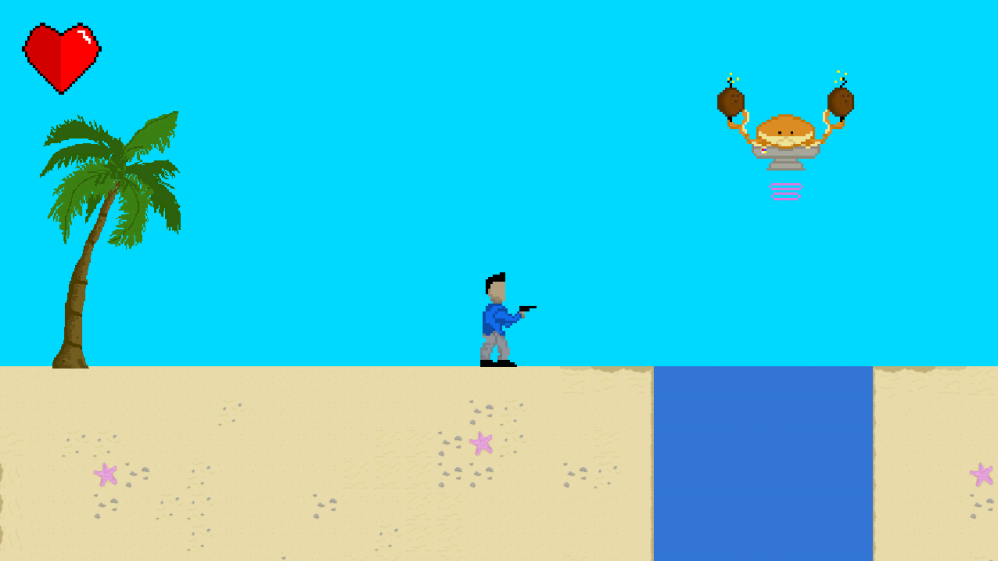
When I press play the game automatically sets the game to ‘Lit’ which means the game will show light and shadow. For a 2D game make a game ‘Lit’ is unnecessary since shadows and light would’ve been drawn in by hand.
This is what the game looks like ‘Lit’
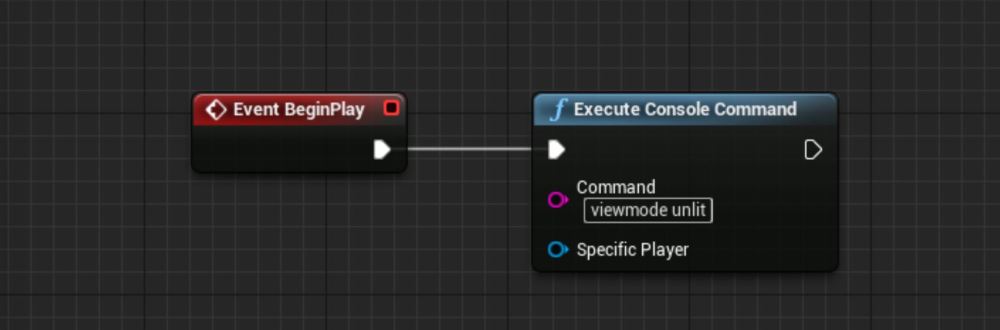
I want the game to be set to unlit to when I press play. To fixed this I went into the level blueprint and on Event BeginPlay I connected a ‘Execute Console Command’ and on command I typed ‘viewmode unlit’.
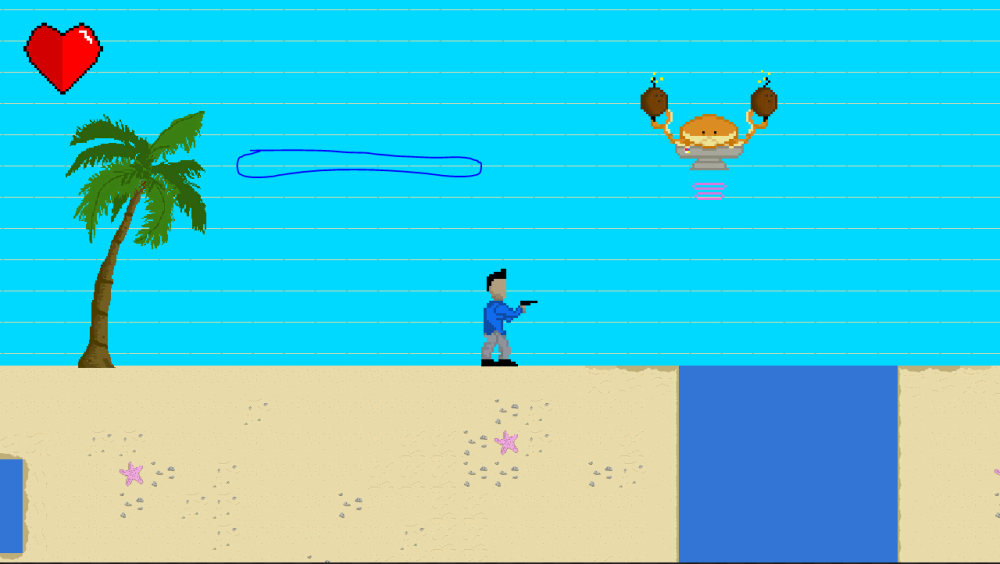
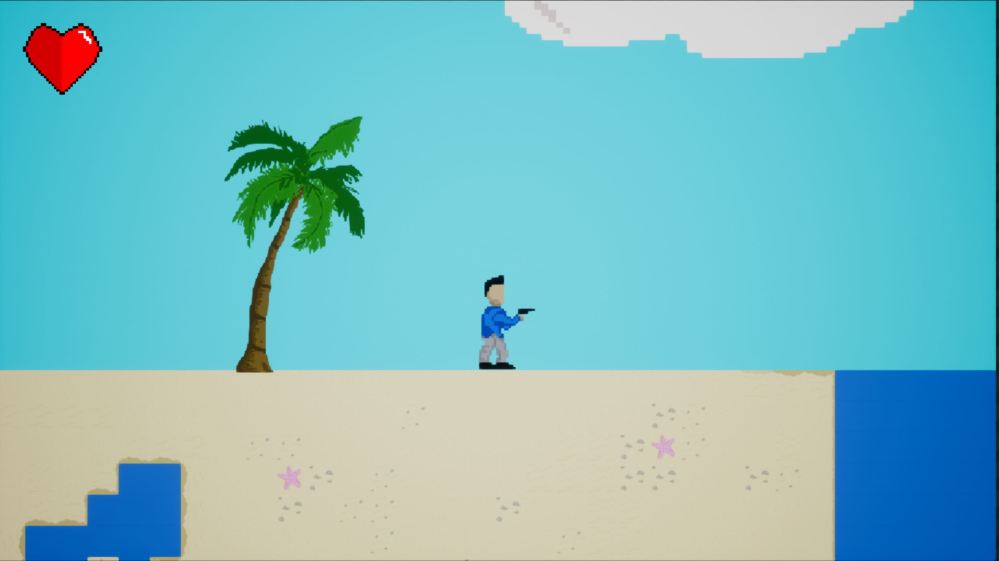
After that the game should be set to unlit when you hit play. This is what y game looks like now.

Notice how brighter this image is when compare to the ‘Lit’ version.
Jungle Level.
This is the final level for my game. I basically do the same thing for this level as I did with the Crab Island level. Only difference between this level and the island level is that there are no palm trees that spawn coconuts and that it is set in the jungle. The techniques that I used to build the island level is the same its just this jungle level has a lot more sprites than there tile maps which means that instead of making a tile set for some of the building blocks I simply just turn them into sprites and drag them into the level. This is because if I turned them into tilesets they would have been too small to see. I wanted the player to see the Mayan art.


These are the tiles that I turned into sprites rather than tile mapping them. I found it a lot easier to just drag them in.
This is what the jungle level ended up looking like.

It is a lot smaller than the previous level but this is just because I was running out of time. You can also see that I recycled the enemy blueprint. Originally I was going to have unique enemies for each level but because time was precious I needed to use the same enemy blueprint.
