Assigning roles
After doing all the research we decided to assign roles. This is so we can focus on one thing rather than focusing on multiple problems at once and then, when we are finished with what we were assigned, we will do all we can to help each other out.
Gareth – Soundtrack & SFX – By using a website called Beepbox Gareth will be able to make the soundtrack and SFX for our game. This is the music that plays while playing the game and the sound effects that you’ll hear when the player interacts with an object (jumping, falling, dying, etc)
Charlotte – Unreal Coding/ Mechanics – Charlotte will mainly be handling the physics and the gameplay mechanics of the game. This means Charlotte will be working with Unreal and making the code that makes our game an Endless Runner.
Jack – Controls – The controls for our game is very important as we want our game to use tilt control meaning the player will be tilting their phone in order to move the ball. Jack will be the one figuring out how to apply this in our game. He will be performing various tests using phones and he’ll be tweaking it along the way.
Myself – Level Design – I’ve been assigned the role of level designer meaning I’ll be doing most of the modelling and texturing. I’ll be making the road, the obstacles, the power ups and power downs (items that when picked up changes the way the game works, could be a positive change or and negative change) and lastly, I will be making the background assets as well which are assets that are not really relevant to the game but serve a visual effect.
I feel confident that everyone will be doing their work to a good standard since everyone was given a role based on what they specialise in however, I feel Jack may get distracted too easily or may come in to lesson late so we have to make sure he’s focused.
Making the assets
Now that the roles have been assigned I then moved on to make the first asset.
The Road
The road is the platform in which the ball rolls on. This is what I had to do to make the road.
I’ll be using the same process with most of the assets I make.
The design of this road is fine but I realized that now that I made the texture I can make a road of similar size but with less polygons so the game runs better.
These are pretty much all the assets we’ll need.
This was a simple task for me. I loved the idea of using UVs as textures as I didn’t have to put a lot of effort on texturing meaning I had more time to provide support for my teammates and also I had a lot of time to work on the next asset I assigned myself to make which the ball itself. So far nothing challenging has happened but I feel like I will struggle a bit for the ball’s texture since I want it to look shell shaded to mimic the style of Tron.
Texturing the ball.
For the ball texture I wanted to achieve the same style of texture as my previous assets but achieving this would be a bit difficult as a sphere does not have edges. I want a tron post process look for the ball.
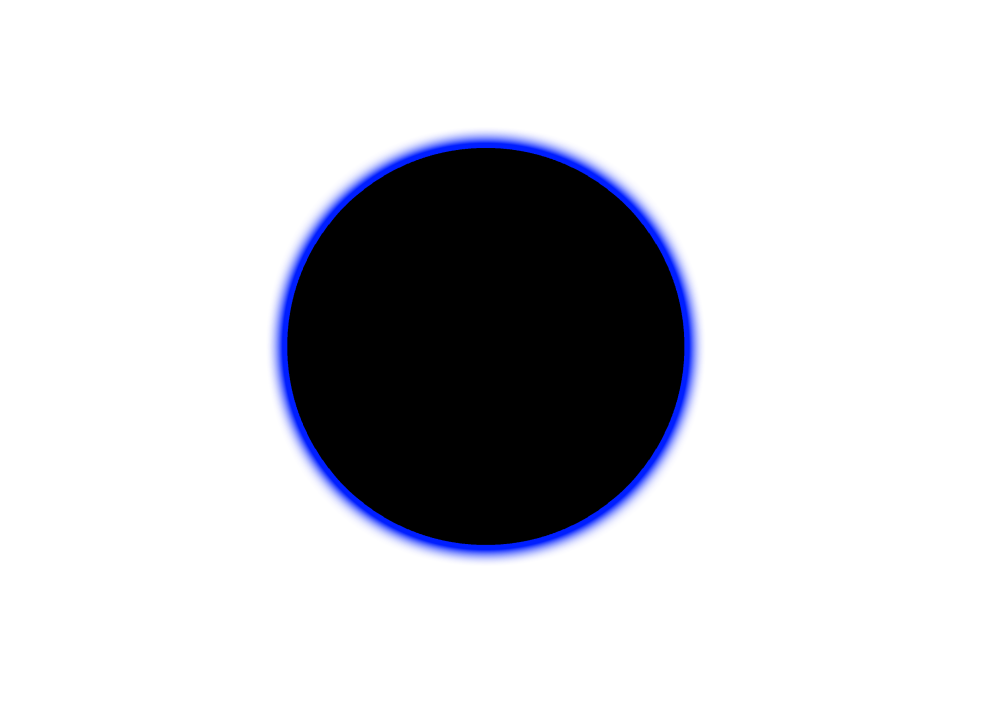
The image above is an example of the look I am trying to achieve. (This art was made by my teammate Gareth).
The first thing I tried to do was mess around with the ‘Fresnel’ node which is a node I found out about recently that gives a bright outline to a given object. The problem with this was that I couldn’t figure out how to change the color of the outline and later found out that the light was actually just a reflection of the background lighting.
I ended up trying something different after this.
The next thing I tried to do was make a cheat post process material. This basically meant that instead of making the whole area post process, I’ll just make a material that makes objects look as if it was post processed. To do this I followed this tutorial on how to highlight objects up to 4:10 since that’s all I needed.
And here is my own version-
This method works but there is one problem that led me to starting over. The problem with using this method is that when I added the post process material into the blueprint, for some reason it messed with the torque and jump height of the ball and this may make it difficult for Jack since he’s in charge of controls.
I then asked my tutor Gareth for help and found a better alternative by using the Fresnel node. Turns out I was onto something with my first attempt.
What Gareth did was add a bunch of multiplys. What multiply does is when you attach it to the emmisive node instead of the object shining white light, the object shines light with the color you assigned to it. The dark blue 3 vector constant node is the color that’s being emitted. The black color in the center of the sphere comes from the 3 vector parameter node when I set the color to dark grey. The reason why I didn’t set it to black was because if I did then the material would end up being see through.
This was probably the most challenging part for me since most of the assets I’ve made in general never really need much tweaking in the material editor. What my tutor Gareth did however, made me realise that I have a general idea of how material editor works since I was close to achieving the right texture with my first attempt. I wish to improve my material editing skills in Unreal Engine to a point where I can make a my own custom water material for my next project for example.
Prototype.
After finishing some of the assets I asked my teammate Gareth to make a sky box to for the background.
This is the PNG of Gareth’s skybox –

With the skybox done and assets complete we set up the visuals of the game. We basically just combined our assets. This is what it looks like together.

We encountered a problem with this skybox that we didn’t really think about. When we add the skybox to the game no matter how big we make the skybox we will eventually hit the end of the skybox since the game is an endless runner. So what we thought was instead of placing the skybox on the level, what we could do instead is add it to the player character blueprint.
I tried adding the skybox to the character blueprint but the skybox would end up spinning with the ball. Obviously I don’t want that so I looked for another solution. Instead of putting it into the character blueprint I again tried to put it on the level. I then went to the level blueprint to see If I can get it to move with the player.
This is the blueprint I came up with.
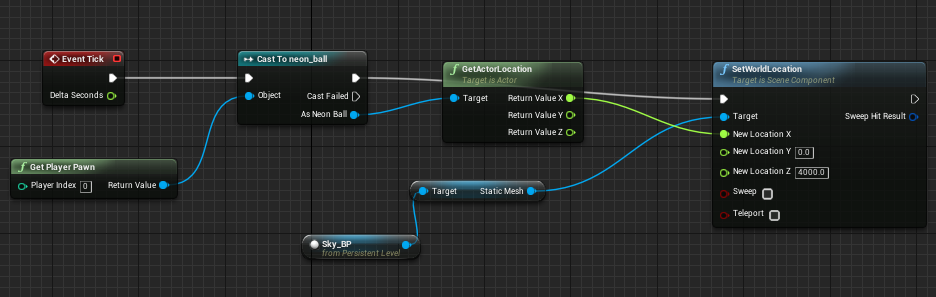
This is on the level blueprint. What you see here is that on event tick (constant event) you cast to the neon ball, it is then attached to a ‘GetActorLocation’ node which means the location of the ball will always be tracked. Then I got the ‘SetWorldLoaction’ of the skybox and attached it to X since the ball will be constantly moving in the X direction.
Glow Sphere
This is what the final product of our game looks like. I did not do this on my own. Charlotte made the constantly generating road and obstacles, Jack made the tilt controls and Gareth made the HUD.
They talk about the process in in detail in their blogs. Here are the links to their blogs:
Charlotte: Charlottepriceweb.wordpress.com
Charlotte learnt how to make the tiles and obstacle spawn the further you go. She went through a couple complications along the way.
Gareth: garethevansblog.wordpress.com
Gareth made all the concept art for our game, he also made the HUD and the particle system for the pick up. I helped him along the way since I had expereince making the HUD for my FMP.
Jack: https://jackfitzpatricksite.wordpress.com/
Jack was in charge of the controls. He managed to figure out how to make the ball move in the X direction constantly and also route the movements to the tilt of the phone.
